
 User guide
Managing integrations

Access information about all your integrations by clicking on your profile image, and then Integrations.

All integrations
The Integrations page is split into All integrations and My integrations. The All integrations page shows all the integrations created in your Kissflow account. You can only access this page if you are an Account Admin inside Kissflow. The My integrations page only lists integrations that you created.
On the integrations page, you can manage all the integrations in your Kissflow account by performing actions like changing state, creating duplicates, and archiving, unarchiving, or deleting integrations. Integrations can exist in two states:
On: When the integration is turned on, it actively checks for new data and performs the actions when triggered. Any data that comes in while an integration is turned off will not be captured when the integration is turned on again.
Off: When the integration is turned off, it stops performing actions and suspends checking for any new incoming data.

To manage and take action on an individual integration, simply click the integration name. You will be taken to the editor page directly.
Viewing integrations
On the Integrations page, you can choose to view the integrations based on two views:
Integration-based view (
) - View the integrations in a list format.
Connector-based view (
) - View the integrations based on the actions and triggers used within the connectors.
Searching your integrations
You can use the search bar at the top of the All integrations or My integrations page to search for specific integrations by name.
You can also sort your integrations based on the following:
- Recently created
- Recently accessed
- Ascending to descending, or vice versa
- Status - ON to OFF, or vice versa
- Archived to unarchived
Managing failed integrations
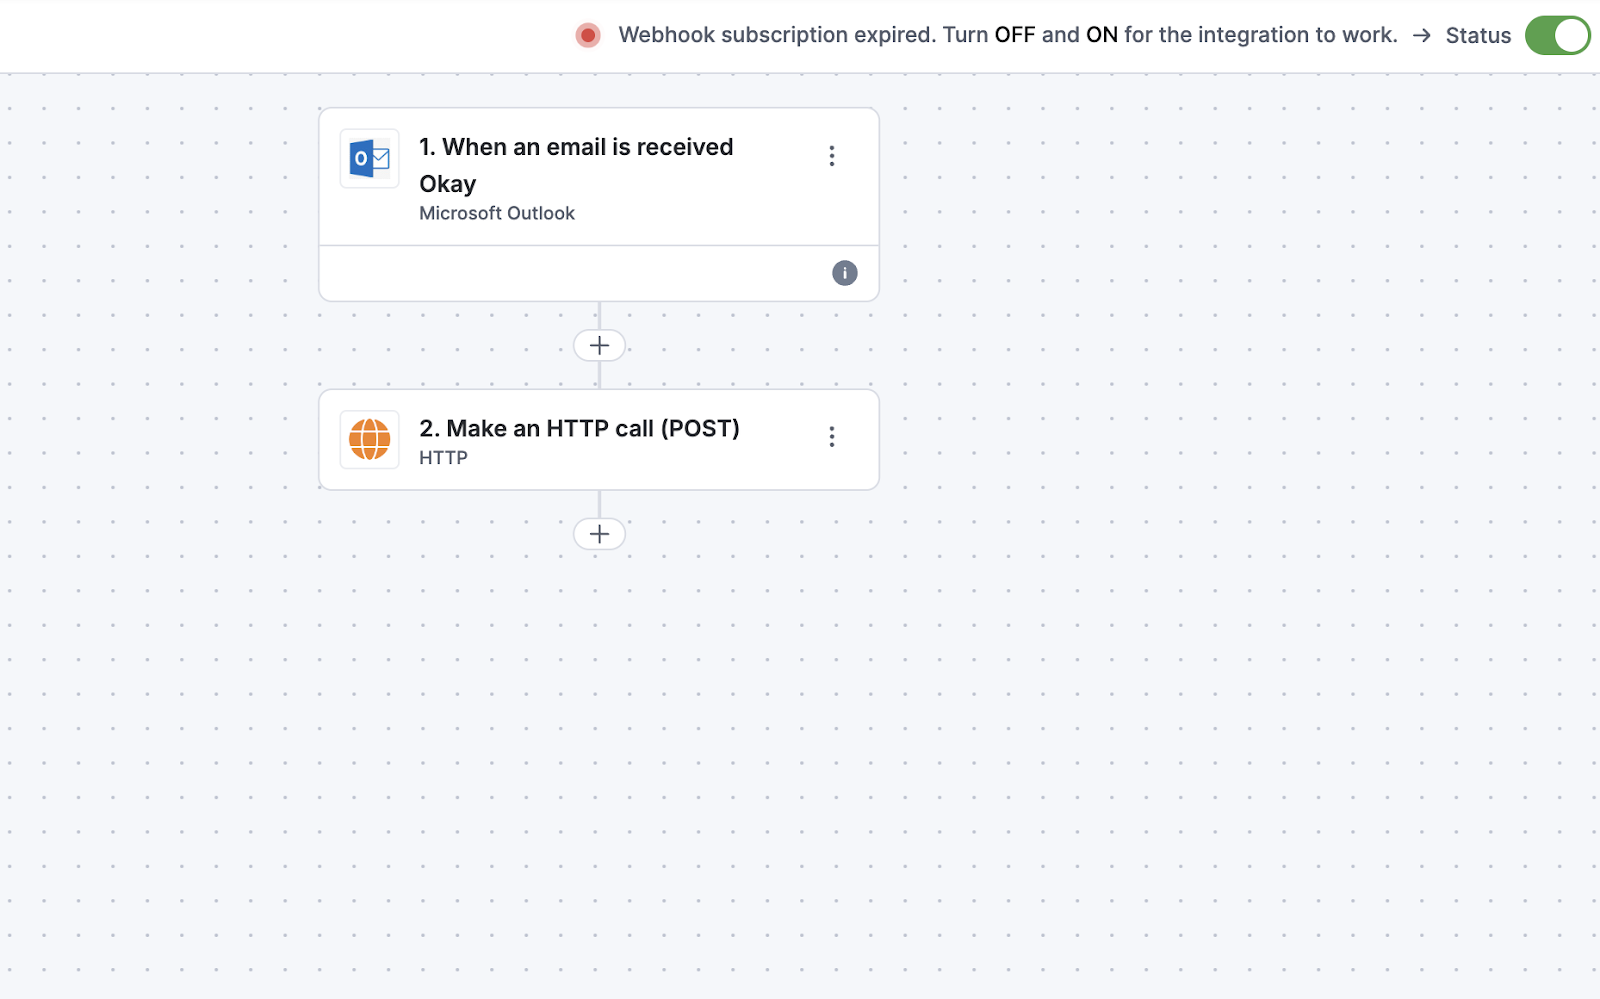
Integrations can fail for various reasons, such as incomplete authentication or incorrect payload. It's also possible that the trigger might not receive any new events because the webhook subscription has expired for that particular trigger. To continue receiving events associated with a specific trigger or action, you must manually renew the webhook subscription. You will be notified of any failures through email and in-app notifications. If an integration has failed due to a failed webhook subscription renewal, follow these steps:
1. Choose the integration that has failed.
2. Change the integration's status from ON to OFF and then back to ON.
Note:
The subscription renewal period varies for different integrations. For most integrations, the webhook expires after 30 days.
Run history
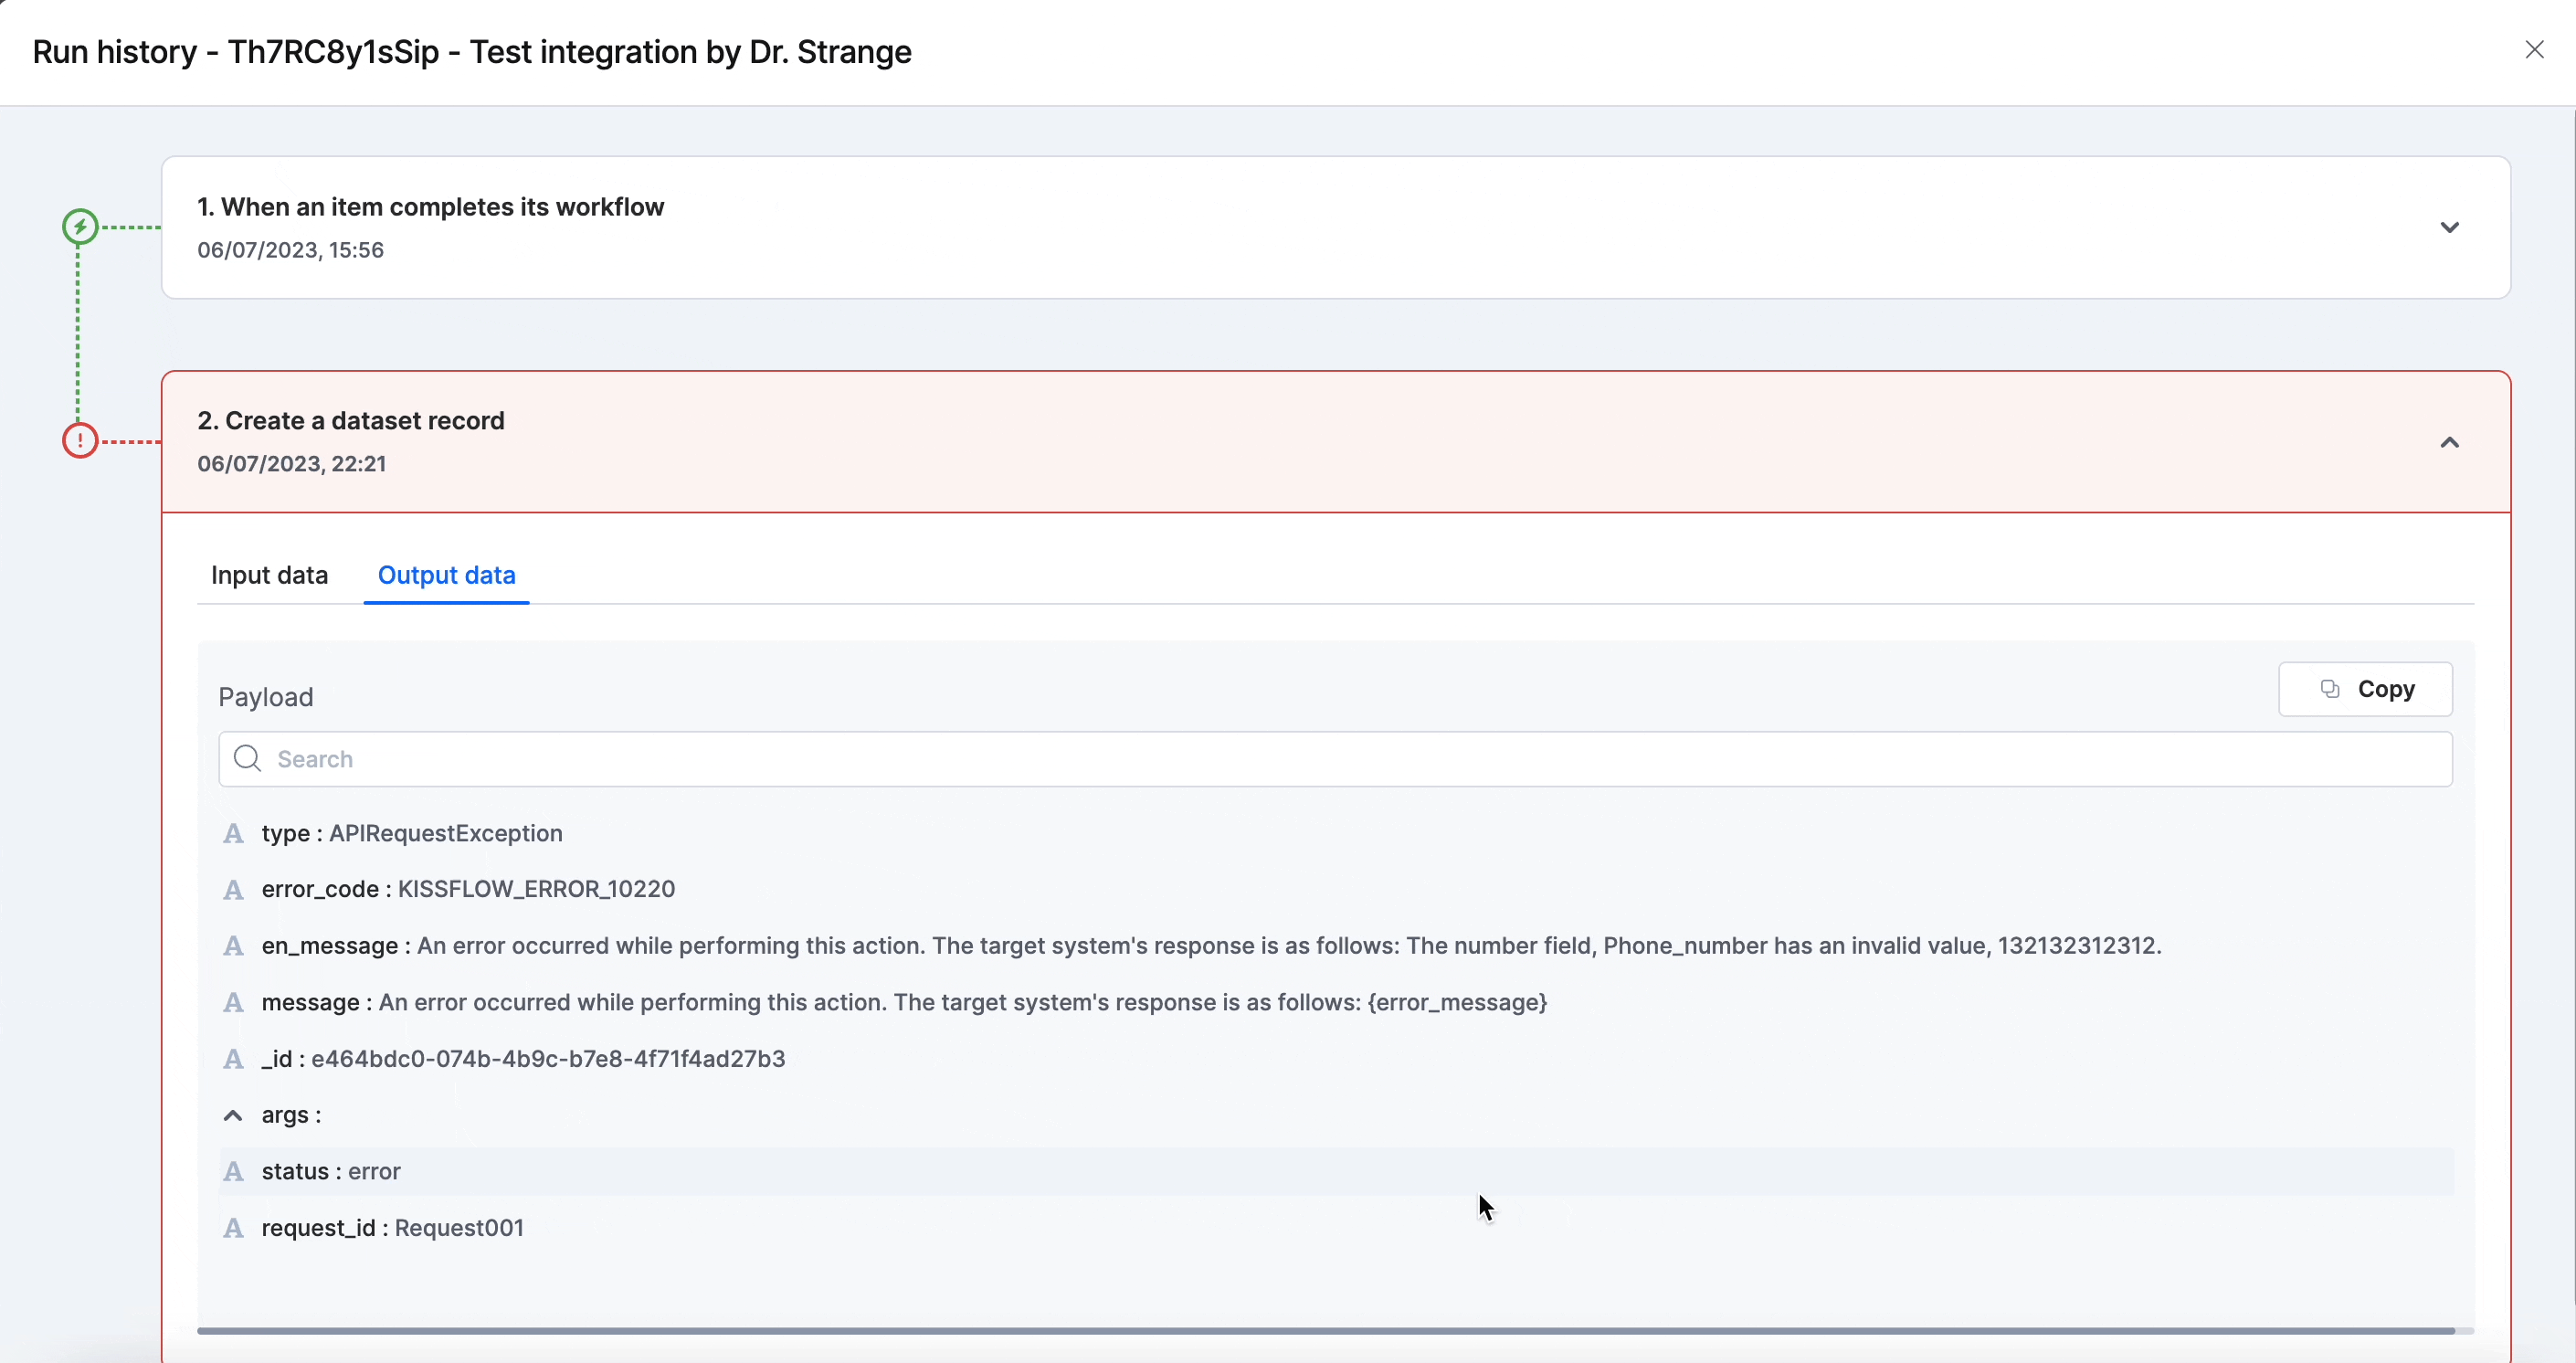
The run history shows a log of all the runs based on date. It shows the unique run ID, integration name, status, and time of execution. When there is a failure, you can run the integration again by clicking the Run again button. You can use the quick filters on the top of the page to filter history based on when it was performed, whether the run was a success or not, or by the integration name.

When you click an individual run, you can view:
- The trigger and action names inside the integration.
- API payload with associated fields and values.
- Status of the integration run; convey the status if it's a success or failure.
- Error messages associated with the payload.

You can use the error message when connecting with the Kissflow support team for faster resolutions.
Editing payloads
In the event of a run failure, you can identify and edit an invalid payload that was sent, allowing you to address the issue and rerun the integration. This grants you enhanced flexibility and control over your failed integrations.
To identify an invalid payload,
- Open the failed integration from the Run history. The action associated with the error will be displayed automatically.
- Navigate to the Output data tab, where you can locate the specific payload causing the failure. You can also copy the payload details if you want by clicking the Copy button.

To edit the payload,
- Go to the Input data tab within the same action, and click the Edit button.
- Edit and validate the details of the payload responsible for the failure.
- Once you’ve made the necessary changes, click the Rerun button to run the integration again with the updated payload.
As an alternative approach, you also have the option to edit the payload directly from the Run history.
- In the Run history, locate the specific run where the failure occurred.
- Click the Edit payload button available for that particular run. This action will open the payload editor, allowing you to make the desired modifications to the payload details.
- Once you’ve edited the payload to your requirements, click the Rerun button to run the integration again with the updated payload.

Connections
Connections are secure authentications that allow Kissflow to communicate with other flows and third-party applications in the integration. Such authentications can be either Access key based or OAuth based. Connections can also be shared with other account members so that they can be used in other integrations.
For example, if you want to create a trigger step that will work with your Kissflow Project items, you must grant access permission to the specific Kissflow Project account. Integration runs require valid connections before triggers and actions can be configured and tested.

Create a connection
To create a new connection, click New Connection on the Connections tab. This will prompt you to set up a new connection. You must provide a name for the connection, and select the connector from the drop down. Upon completion, click Next.
Based on the connector you've selected, you will need to authenticate your connection with your Kissflow account Access key and secret or use the third-party OAuth based authentication.
For Access key based authentication, you must enter your Account domain, Access key, Account ID and click Authenticate after you enter the required values.
Keep your Access key status ON to ensure successful authentication.
While creating a connection to most third party connectors, Kissflow will redirect you to their respective page where you will be prompted to grant Kissflow access to your data. This will be based on the OAuth authentication.
If everything goes well, a successful connection is established.
Testing your connections
To test if the connection between a connector and Kissflow is still active, click the Test button of the connection.
There are two possible cases after you test your connection. They are:
- Test successful: The connection is active.
- Reconnection needed: The connection is no longer active. This means you will need to reconnect with your connector.
Renaming your connections
If you have multiple Kissflow accounts for the same connector linked to Kissflow, you can rename them to easily identify each of them in your Kissflow account.
- Go to the Connections tab.
- Click the More options (
 ) button at the end of the connection name and select Rename. Alternatively, click the Edit (
 ) button beside the connection name. The new connection name will be auto-saved soon after entering the new connection name.
Reconnect your connections
The connections between a connector and Kissflow may expire if the Access key and secret are suspended/deleted or due to a connection error. To reconnect with a connector account, click the More options () button at the end of the connection name and select Reconnect. You must re-authenticate your connection with a new Access key and secret or reconfigure your OAuth based connection.
Sharing connections
Connections can also be shared with other account users. This manner, a shared connection can be used in integration steps that you did not create. Connections can be viewed in either a list or a segment view. It can also be filtered to see all connections, connections created by you or shared with you.
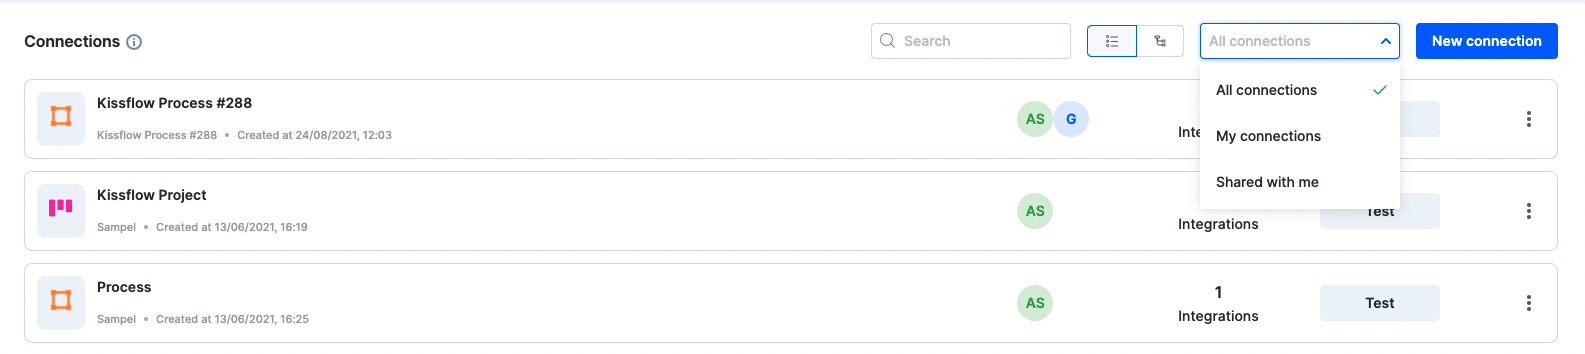
You can also view the list of integrations that the connection is a part of by clicking the integration count.

To share a connection:
Go to the Connections tab.
Click the More options (
) button at the end of the connection name and select Share.- Then, click + Add members button to add members and assign them member or admin permissions.

Connection role |
Permissions |
Admin |
Can use and modify the connection in any integration steps |
Member |
Can only use the connection in any integration steps |
Connections used within an integration are not inherited unless they are intentionally shared with you.