
 User guide
Process live forms

You can view a process form when you open a process item.

A process form has a common navigation strip at the right end, where you can switch between the Details and Comments tabs.
You can navigate to the different sections of a process form by hovering over the quick access menu () at the top left and clicking the sections. For convenience, you can lock it in place by clicking the Lock sections panel button (
).
All actions that the Flow Admin has configured are at the bottom. You can act on the form using these buttons.

Form
You can see the fields, sections, and tables you have configured in the form. Your permissions, visibility, and appearance settings govern which fields appear on the form and which are editable.
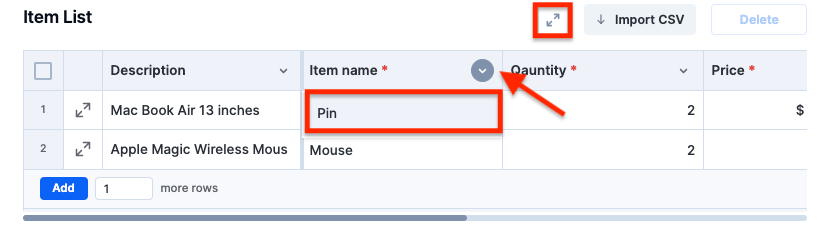
Tables
Tables display field names as columns and allow you to add as many rows as you want.
You can improve your table viewing by selecting one of these four options:
- Place the cursor on the field's edge, click, then drag to resize the field width.
- Drag and drop the fields to reorder them.
- Pin and unpin fields to the left side so that they are always visible when you scroll horizontally. To pick this option, click the down arrow at the end of the field name. When you drag a field into the pinned section, it becomes pinned automatically.
- Dragging it out of the pinned section unpins it.
- Click the Fullscreen button (
 )
)
To delete a row, pick one or multiple rows by clicking the checkboxes on the row's left side and then click Delete.
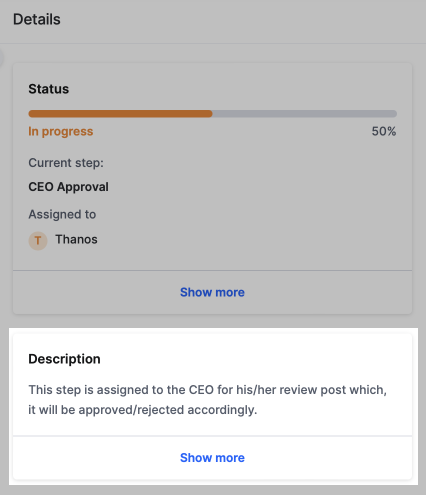
Item details
You can view the Status and Description details of a process item in the Details tab of a process form.

Status
A progress bar will reflect the item's completion percentage.
In progress, Draft, Completed, Rejected, or Withdrawn are the statuses a process item can be in.
It will display the current step's name.
It will display the step's assignees. If there are multiple assignees, you can view them all by clicking on the link.
If you click Show more, you'll see a flow chart of the workflow, including the date and time each step was completed, what steps are yet to be completed, and any notes if the item is sent back or rejected.

Description
The description you entered when creating the step in the workflow editor is shown here.
Comments
Click the Comments tab in the right navigation strip to add and like comments in the process items. However, irrespective of which role you are in, you cannot delete a comment regardless of who added it.
You can assign a comment to a user who is a participant in the workflow if you have mentioned them in the comment.
