
 User guide
Setting up Kissflow BI connector with Microsoft Power BI via ODBC

Kissflow BI connector allows you to access your Kissflow data stored in a Snowflake database with Microsoft Power BI via the ODBC driver. The ODBC driver acts as the interface for Microsoft Power BI to connect to Snowflake. By setting up this connection, you can access and analyze your Kissflow data in Microsoft Power BI.
You can achieve this in three steps:
- Configure your Kissflow account with the Snowflake database.
- Configure the Snowflake ODBC driver to act as the interface. To complete the Snowflake ODBC configuration, you must enter the connection parameters. Click here to learn how to obtain the Kissflow account ID, credentials, and server URL.
- Set up a Kissflow BI connector with Microsoft Power BI. This document goes into detail about how you can set up a Kissflow BI connector with Microsoft Power BI.
Downloading and installing the ODBC driver
To enable the ODBC connection for the Kissflow connector, you need to download and install the Snowflake ODBC driver in your Windows machine . Learn to download the Snowflake ODBC driver from the Snowflake website.
Configuring the ODBC driver
To configure the Snowflake ODBC driver in Windows, follow these steps:
- Open the Windows Data Source Administration tool. You can open the ODBC Data Source Administrator by going to Start > Control Panel > Administrative Tools > ODBC Data Sources (64-bit).

- Verify that the snowflake ODBC driver is installed. In the ODBC Data Source, click the Drivers tab. The Snowflake ODBC driver should be listed in the Drivers list.

- Create a new DSN (Data Source Name). In the ODBC Data Source, click the Add button.
- In the Create New data Source dialog box, select the Snowflake ODBC driver from the list of drivers and click Finish.

- Enter the connection parameters for the driver. In the Snowflake Configuration dialog box, enter the following connection parameters:
- Data Source: The name of the Snowflake database which is the Kissflow account id.
- User: The username of the Snowflake database which is the username you have received in your mail while enabling the Kissflow connector.
- Password: The password for the Snowflake database which you have created.
- Server: The hostname or IP address of the Snowflake server which is the URL received in your mail along with your username.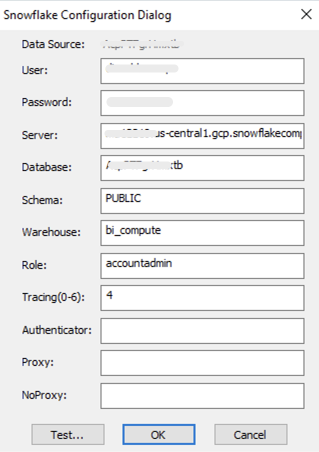
- Once you configure the Snowflake, click Test to check whether the configuration is successful and click OK.

- Once you have created the DSN, you can open Microsoft Power BI.
- Click Get data in Power BI.

- Choose ODBC and the DSN that you have created.


- Click OK.
Now you have successfully enabled the ODBC connection with Microsoft Power Bi. You can start importing your data into Power BI. Please follow the instructions in this document on how to do it.