
 User guide
Expensify connector

What is Expensify?
Expensify is an application that makes it easy to import expenses directly from a credit card to create expense reports quickly and easily.
Connecting to Expensify
The Expensify connector of Kissflow Integration enables you to connect and use your expense reports created in Expensify with popular third-party apps and Kissflow apps. You must have a valid Expensify account and be a paid Kissflow customer in order to integrate with Expensify. For now, the connector for Expensify does not support any trigger events.
Let's take an example where,
- A consultant buys a flight linked for an onsite visit and will need to be reimbursed.
- The ticket details are received via Gmail. The expense details are moved automatically to Expensify via this integration.
- The Expensify report can then act as a trigger for your reimbursement process workflow, where a new item is raised in Kissflow Process along with the Expensify report.
Actions in Expensify
Action events |
Description |
Create single expense |
This action creates a single expense item in Expensify |
Expensify connector as an action step
- Inside your Kissflow account, click your profile picture on the top right corner of the screen and click Integrations from the dropdown. Now, click the New integration button to provide a name and description for your integration.
- Set up trigger step, for example, you can use it to connect with your Gmail account. Each time new expense details in your Gmail inbox, this can lead to an action in the integration.
- After setting up your trigger step above, click the Add button (
) next to set up your Expensify action step. Search for Expensify and select an available action event.

4. After choosing your action event, next step is to authenticate your connector.
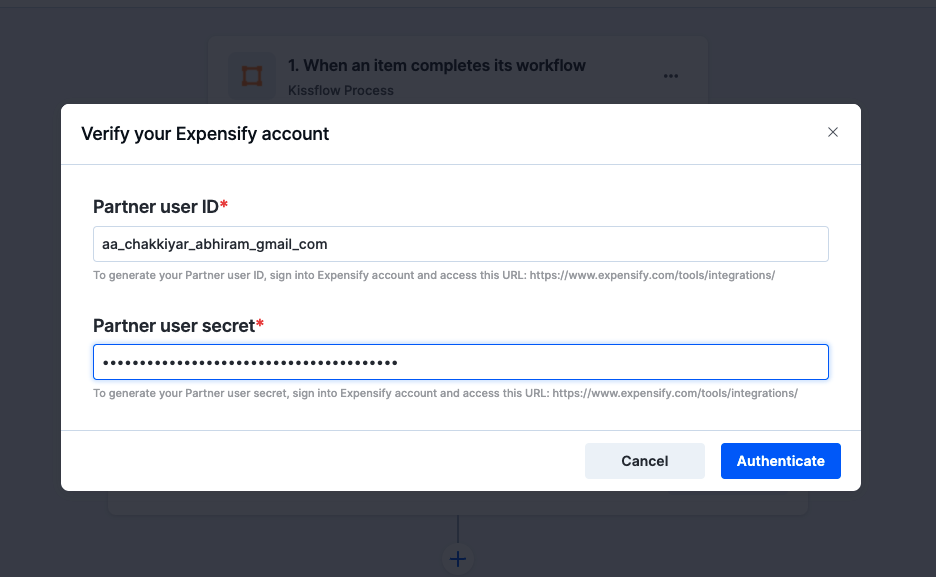
5. Click +Add an account and you'll be prompted to enter a unique Partner user ID and Partner user secret from your Expensify account. These are different from your normal Expensify username and password.
To generate your unique Partner ID and secret in Expensify, sign into your Expensify account, then access this URL: https://www.expensify.com/tools/integrations/

6. After authenticating with your Expensify credentials, add the relevant values against the Expensify form fields, hit Refresh fields to view all the updated fields in the selected Expensify form. You can also map Expensify fields with your trigger step or previous action's fields. The field values will be automatically added to the item fields after the action is executed.
7. After a successful configuration, test whether your Expensify action step is set up correctly by clicking the Test button. The connector will pull field data from your selected Expensify account and display it as a JSON output. Similar to the trigger step, errors are notified to you right away. Fix them before retesting the action step.
Setting up an Expensify workflow
After creating a custom workflow with your Expensify action step, switch ON the toggle button to activate the integration run. When the integration is active, an expense will be newly created on your Expensify account allowing you to create a comprehensive expense report.