
 User guide
Kissflow Process connector

Connecting to Kissflow Process
Integration members with permission to access a process can use connectors to send data from a process to other flows in Kissflow or third-party apps. Similarly, connectors can be used to receive data to perform specific actions in your process.
For example, you have a case system for managing your help desk and you’d like certain tickets identified as change requests to go through a feature approval process. For this to happen, the case system and process should talk to each other. Connectors make this conversation happen seamlessly. Using predefined connectors, you can set up triggers and actions so that when a new change request is added in your help desk, a corresponding item gets logged in your feature approval process.
Triggers for Kissflow Process
Trigger |
Description |
When an item is created |
Triggers as soon as someone clicks the New item button. |
When a draft item is submitted |
Triggers when someone submits an item after clicking the New item button or a form in the draft queue. For workflows where the first step is a parallel branch, always use this trigger over the step trigger "When an item enters this step". |
When an item advances to next step |
Triggers only after all the step assignees approve the item and it advances to the next step in the workflow. |
When an item is rejected |
Triggers when an item is rejected at any step. |
When an item is withdrawn |
Triggers when the initiator withdraws an item at any step. |
When an item crosses its deadline |
Triggers when any item breaches its deadline (SLA) at any step. |
When an item is reassigned |
Triggers when any item is reassigned at any step. |
When an item is sent back |
Triggers when any item is sent back to a previous step. |
When an item completes its workflow. |
Triggers when any item reaches the end of the workflow. |
When an item enters this step |
Triggers when any item enters a particular step in the workflow. |
When an item exits this step |
Triggers when the item either advances to the next step, is sent back to a previous step, is rejected, is withdrawn by the initiator, or stopped in parallel branches. |
When an item is approved by an assignee at this step |
Triggers every time any assignee approves an item at a particular step. Based on the step assignment configuration, the item may or may not advance to the next step in the workflow. |
When an item is rejected by an assignee at this step |
Triggers when any assignee rejects an item at this step. The item will be sent back to the initiator. |
When an item crosses its deadline at this step |
Triggers when an item breaches its deadline (SLA) at a particular step. |
When an item is reassigned at this step |
Triggers when an item is reassigned to another assignee at a particular step. |
When an item is about to enter the step |
Triggers when an item enters a step irrespective of the skip condition. |
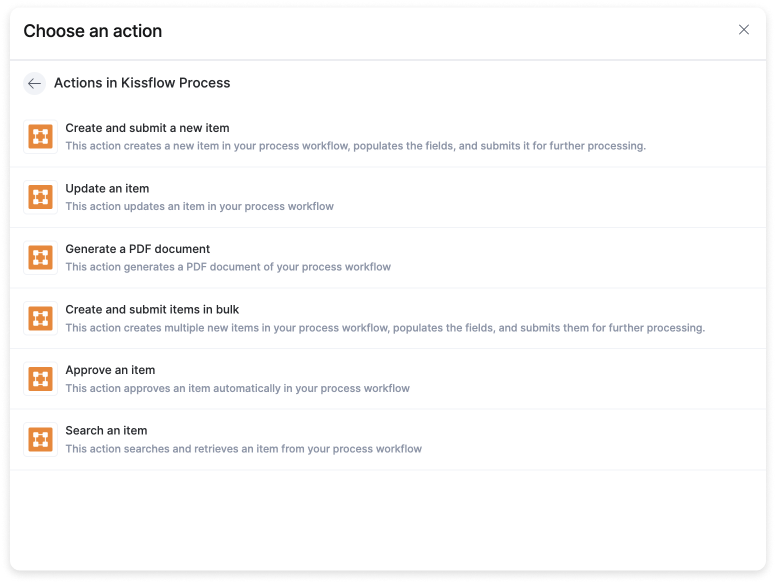
Actions for Kissflow Process
Action |
Description |
Create and submit a new item |
This action creates a new item in your process workflow, populates the fields, and submits it for further processing. |
Update an item |
This action updates an item in your process workflow. |
Generate a PDF document |
This action generates a PDF document of your process workflow. |
Create and submit items in bulk |
This action creates multiple new items in your process workflow, populates the fields, and submits them for further processing. |
Approve an item |
This action approves an item automatically in your process workflow. |
Search an item |
This action searches and retrieves an item from your process workflow. |
Using a connector as a trigger
- Create a new integration.
- Select the Kissflow Process connector and then choose a trigger. You can also use the search to find a trigger directly.
- Create a new connection or use an existing connection in your account. You can connect to another Kissflow account or use your own Kissflow account. Connection is authenticated using your Access keys and secret tokens. After authenticating the connection, click Next.
- Select the process that you want to work with. Click Next.
- Test whether your trigger is set up correctly by clicking the Test trigger button. The connector will pull field data from your selected process and display it in JSON format. If there's an error with the setup, you'll receive a message regarding the same. Retest the trigger after making the necessary changes.

Using a connector as an action
Click the process connector and select an action step from the available options.
- Similar to how you would set up a trigger, set up a connection with the required account.
- After choosing a process, add relevant values against the form fields. You can refresh fields to view all the updated fields in the form. You can also map form fields from your trigger step or fields from your previous action steps. These values will be automatically added to the fields after the action is executed.
- Test whether your action step is set up correctly by clicking the Test action button. The connector will pull field data from your process and display it in JSON format. Errors, if any, are notified to you right away. Fix them before retesting the action.
After setting up the required triggers and actions, go to the top right corner of the editor to turn on the integration so as to activate it.