User guide
Kissflow Chat connector

Note:
The Kissflow Chat connector will be discontinued after 15th December, 2023. Learn more
Chat connector
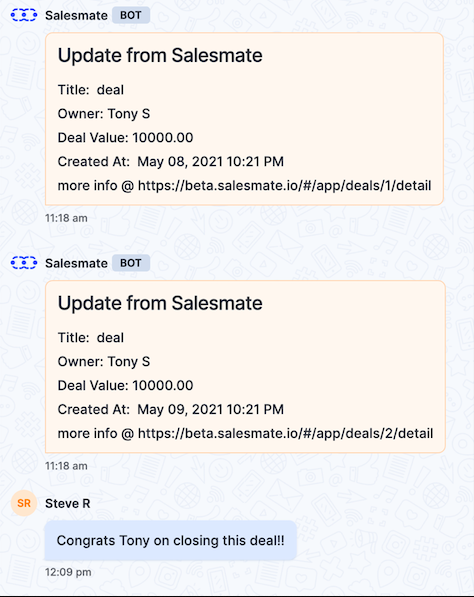
Chat connector lets you integrate chat with other flows and third-party applications. You can configure bots for integrations and customize them so that automatic messages are sent to a chat conversation when a specific action is triggered.
For example, you can use this connector to integrate chat with your Salesmate or Jira account. Webhooks can be used as triggers to receive messages whenever there are updates to deals or other tasks in the accounts.
Action(s) in the connector
Action |
Description |
Send message |
Send messages to a specific chat conversation when a configured action is triggered. |
Configuring the connector
- In your Kissflow account, click your profile picture on the top right corner of the screen and click Integrations. Click the New integration button to provide a name and description for your integration.
- In the editor, select the Kissflow chat connector and then choose a trigger. You can also use the search to find a trigger directly. For instance, use a webhook from a third-party application or a trigger from one of the flows in Kissflow.
- Click the Add button (+) to add an action. Search for the chat connector and select Send message as the action.
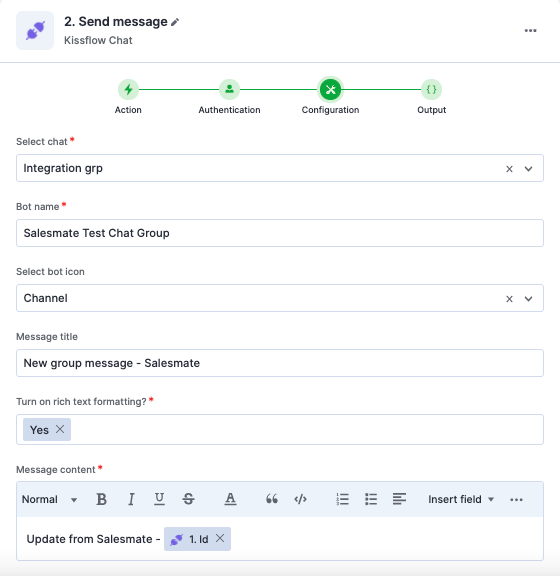
- Configure your account next.
- Select a chat conversation to which messages are sent.
- In the Bot name field, enter a name for your integration. The name that you provide here appears in the automated messages you receive in chat.
- Select a bot icon. You can use the default icons from one of the following:
If you don't select an icon, the default icon is used in messages.
- Process.

- Board

- Project.

- Dataset

- Channel
- Team
- Salesmate
- Jira
- Google Cloud Monitoring
- Jenkins
- MongoDB Cloud
- Process.
- Turn on or off rich text formatting for the message.
- Enter the message title and the message content. If formatting is turned on, you can use the various options to format and structure the message.
- After a successful configuration, test whether the action is set up correctly. The connector will pull data from the specified conversation and display it as a JSON output. Errors are notified to you right away. Fix them before completing the action step.
Using the connector
After configuring your connector, turn ON the toggle button in the upper-right corner of the editor to activate the bot. Whenever the configured action is triggered, the bot sends an automatic message to the specified chat.